We believe we have finally finished the so-called “Hare-pen,” or our colony rabbitry. For any of you who may be new to my blog, we have spent the last 8 months or longer designing an outdoor, fenced-in yard, where several of our breeding rabbits could run free and act as natural as possible. Read this post for more information on that, as well as details on how we first constructed it. To try to lay it out more smoothly, though, I will summarize all past posts here.
Like with other rabbitries, first we built the cages, or in our case, the bunny-condos. Read this post for more info on the cage system we custom-built. We planned to use the cages to gradually wean the rabbits out into the yard, and then later to separate breeding animals, quarantine new rabbits, confine rabbits scheduled for harvesting, etc.
Stage 1 involved building a large fenced yard, with the main fence being 5 foot tall 2×4 welded wire (aka horse fence), and lining the lower portion of the fence with chicken wire to prevent escapes by smaller kits.
Next, we built some nest boxes to simulate natural dens, and designed tunnels to simulate underground burrows leading to the nest box-dens. Our first attempt at this failed miserably (read here for details on that), but we believe our most recent attempt will be better. The same basic idea was used, but we designed a total of 4 nest boxes set up in a square (of sorts). One nest box was located at each corner of the square.
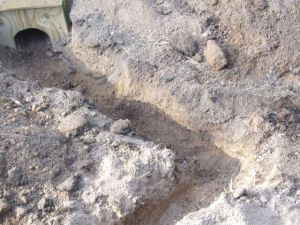
Then, instead of using ducting this time, he used a bunch of scrap lumber to build 3-sided boxes (2 sides and a top), and then laid wire on the bottom. The wire prevented digging and offered good traction, while the wood supported the dirt and weight of people walking over it while still simulating the tunnel. Each box had a separate tunnel leading from it to join another tunnel, then both were joined to save time on digging.
For the record, after we move to Red Gate and re-make this, all tunnels will be made from 7″ PVC, with grooves cut on the bottom side and filled with dirt for traction. We couldn’t find any in our local area, so we had to improvise. Menards in the midwest carries the correct size PVC, however–in the event you happen to live in the midwest and shop at Menards.
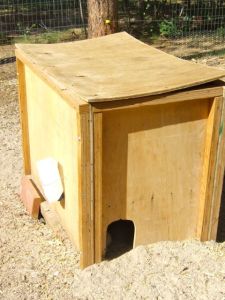
Finally, all tunnels were designed to come up in the center of the square, into a community shelter. The shelter was also recycled from an old shipping crate, so we simply found a way to make it work. The shelter has a little opening on each end for the rabbits to get in and out. It also has a water bottle hanging on the outside of each end, with the nipple going through a hole to the inside, and a food dish inside.
Because rabbits can be territorial and fight viciously if they feel crowded, we decided to divide the box into two sections, with each half basically mirroring the other. So, the box was divided in the middle, and a shelf installed over the divider, covering half of each side. This is simply to give the bunnies an area to lay off the ground (and they use it all the time, by the way!!).
The shelf on each side is located over the entrance to the tunnels for that side of the pen, with each hole accessing two separate tunnels. In the photo below, you can see a couple of older kits resting in the cool dirt entrance of the tunnels for that side.
While we have no access to the tunnels themselves, all other structures have a lid to allow us to maintain and check on things. This includes the community shelter and all 4 next boxes, with the nest box lids being the only part of the boxes you can see at ground level. In addition, as a finishing touch, we laid a 4 foot section of 2×4 fencing on the ground around the entire perimeter. We found early on that the rabbits truly love to dig, but for the most part, they tend to dig the largest tunnels near a upright structure like a fence, a building, or a box. We have found that by installing the section of fence on the perimeter (which can just be seen in the next photo), the rabbits have mostly stopped tunneling with the exception of a small one that starts on the outside of the community shelter, and goes up under it. We are currently monitoring the length of the tunnel to see what happens.
If tunneling begins to be a problem, we will simply cover the entire ground in the fencing, with cut-out areas for the openings to the tunnels and nest box lids only. Again, we love the rabbits to be as happy and natural as possible, so because they do dig small holes in the unfenced dirt, should we cover the ground, we would put mounds of dirt here and there around the pen so they have a sand pile to play and dig in.
I realize it is very difficult to get the overall picture of this set-up, so I have tried to put together a sketch for you to show an arial view of sorts. Unfortunately for you (but great for me!!), we just switched from the age-old Microsoft computer to an iMac, and I am still figuring it out. In other words, no fancy semi-pro looking computer sketches, or even decent editing for that matter, for you this time. You were lucky I figured out how to scan a document! Had I not a had a few hours to spare on this day of rest, even that wouldn’t have happened!!
Well, that’s it for the new rabbitry. We now have a regular colony of 2 does, 1 buck, and a litter of almost-harvest-ready kits, in addition to a week old litter (our 2nd hare-pen-born) that I will tell you about later. Hope this all makes sense. Just leave me a comment with your questions if not.


June 19, 2012 at 3:49 am
Looks and sounds great!!! I am contemplating something similar.. But for now the rabbits are being moved around on the ground in their cages..
October 16, 2012 at 7:53 pm
[…] are a few things I don’t really like about our current Hare-pen design, but last night, it proved it’s worth, that’s for sure. There are some very […]